Build and publish your iOS app to TestFlight using Xcode Cloud
Recently, Apple announced that they’re going to offer 25 computing hours of Xcode Cloud each month for free.
If you’re just starting up your app or if you don’t already have a pipeline, I strongly suggest you use Xcode Cloud. In the past I’ve done it using Fastlane and the setup part was way too complex having to deal with provisioning profiles, environment setups, and much more.
You can do this either from the browser if you go to the Apple Developer Console or directly from Xcode. I’ve done it both ways, they’re similar enough and they shouldn’t provide difficulties if you choose one over the other. In this post, I’ll use Xcode.
Step 1: Open Xcode, in the side window, select the last option from the icon list (called “Show report navigator”). Then right-click anywhere and select “Manage Workflows”.

Step 2: In the “Manager Workflows” screen, click the plus button to add a new workflow and select the desired product (in the above case PagoInvoiceIntegrator)

Step 3: The first one we need to set up is the “General Tab‘:
- Set an explicit name for your workflow
- Add a clear short description for your future self
- Select the repository from where to pull the code (you might need to give it access to your repo)
- Select the desired workspace

Step 4: We need to define the start conditions for the build. Usually, you’ll want to do this when you push your code to a certain branch after a pull request is approved and merged.
You can select your main/develop branch and tick the “Start a Build If Any File Changes‘ checkbox.

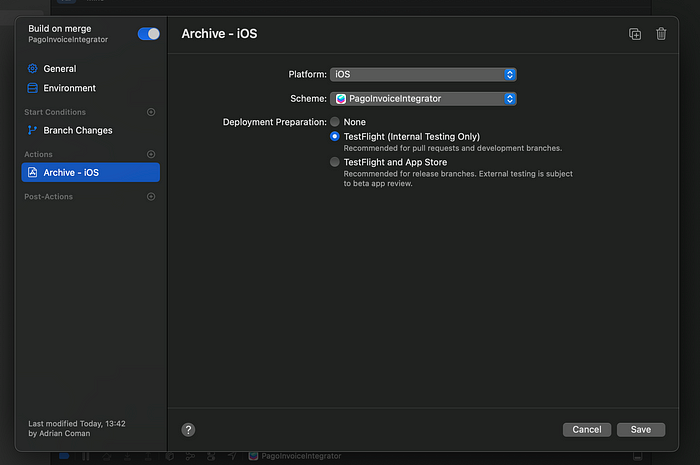
Step 5: We’ll need to create the actions we want to run after your code gets pulled from the previously selected branch. For this use case, we’re interested in the “Archive“ action that will build the project, generate the IPA, sign it, and store it as an artifact for the next step.
Select the desired platform, schema and check the checkbox to deploy to TestFlight (Internal Testing Only).
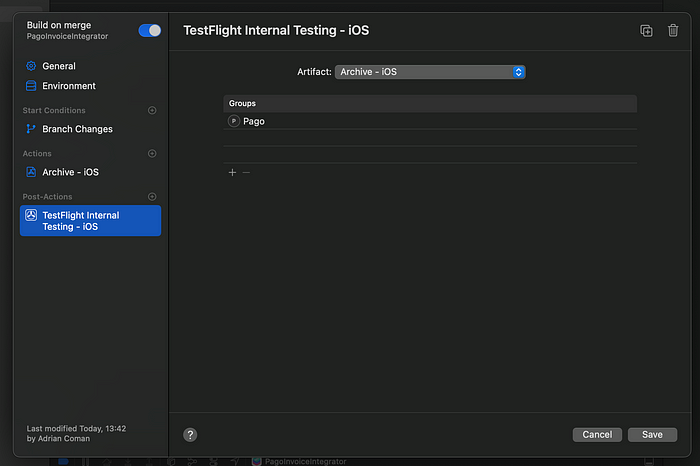
Step 6: Post actions are the actions we want to do once the build/archive/tests are done. In this case, we want to publish the IPA to TestFlight. Make sure you select the artifact that you generated earlier (top middle of the screen) and the group to which you want to receive the build.
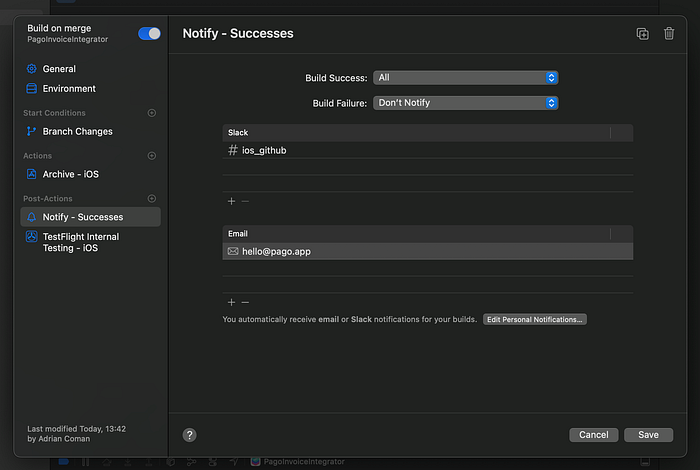
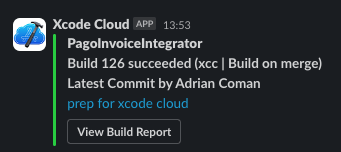
Step 7 (optional): We can also send a message to a Slack channel or send an email notification when the build is done. Just click the plus button and add the “notify” post-action.
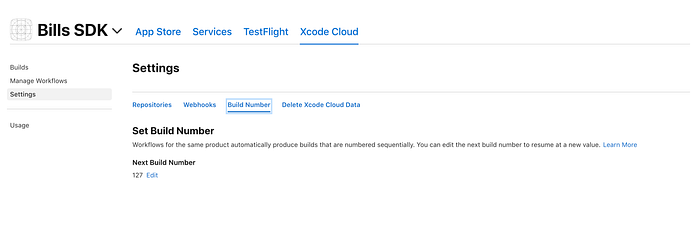
Step 8: Next up, we’ll want to set the build number for the builds. You need this only if you’ve previously published a build to TestFlight.
Go to App Store Connect → Select the desired Build → Settings → Build Number → and set the build number as the last build number that you’ve used +1 (for example, when our last build was 126, we set it to 127).
Step 9: Go to the Builds section and select “Start Build“. If you have any other submodules that are on other git repositories, you might need to give access to them when the build fails. As of this moment, I couldn’t find an option to grant access upfront to all the repos (especially if they’re in a different organization than the initial one you’ve set up).

And that’s it! You have your builds delivered to TestFlight and (optionally) a message sent on your Slack channel, as well.
After I spent more than a few hours developing a similar pipeline using Fastlane on a machine that runs Jenkins and struggling with provisioning profiles, certificates, API keys, and various other challenges, I just couldn’t believe that in just 30 minutes I accomplished the same task with significantly fewer steps ales less headache.